資訊安全是近年來相當熱門的話題,在網際網路上所發生的資訊安全事件更是層出不窮,因此資訊安全設備成為網路安全中相當重要的一個環節,在網路上經常可以看到防火牆(Firewall)、入侵偵測系統(Intrusion Detection System,IDS)、入侵防禦系統(Intrusion Prevention System,IPS)或是針對傳送內容進行過濾與分析的設備,透過比對與分析提供網路管理員更完整的資訊,以進行安全防護。
大多數的設備都屬於網路架構上的網路型防護設備,而提供服務的伺服器,只能夠透過行為的分析來找出可疑的網路流量,這樣的處理方式必須累積大量的資訊才能夠找出相關的行為模式。而主機型的入侵偵測系統,則是透過安裝在主機上的偵測程式,進行主機端的網路流量與行為分析,能夠更準確找出可疑的網路行為,而透過端點防護的機制,也可以縮短分析的時效。
認識偵測與防禦系統
偵測與防禦是處理異常網路行為時的兩個步驟,透過所建置的網路型與主機型入侵偵測系統,能夠掌握目前網路和主機端的可疑行為,因此大多數的設備都會根據本身的特徵資料庫進行網路封包比對與行為的分析,當符合特徵資料庫中的紀錄時,就會發出相關的訊息。當特徵資料庫所搜集的特徵資料越多時,能夠偵測出來的異常網路行為就更廣泛。不論是網路型或主機型的入侵偵測系統,強調的都是希望能夠即時透過監控找出異常的狀態。在實際的網路環境中,如果想要完整掌握實際的狀態,都必須同時搭配這兩種不同的機制。
偵測與防禦系統兩者最大的差別,在於前者僅提供網路行為與特徵偵測的功能,發現相符合的行為後,透過指定的方式發出相關的訊息,後續不會進行任何的處置措施,而防禦系統除了具備偵測系統原有的功能外,還能夠針對後續的處理方式,執行預先設定好的處理規則,做到自動化反應的機制。
兩者之間的運作各有不同的方式,也具備不同的優缺點,至於要在現有的環境中,採用那一種較好,則須依據需求來決定。如果希望透過人為的判斷再進行後續的處置,選擇使用入侵偵測系統即可,反之,如果希望在狀態發生時,能夠依據預先設定好的處置規則處理,則選擇入侵防禦系統,以達到早期處置的目標。
建置OSSEC主機型入侵偵測系統
目前市面上已經有許多提供主機型入侵偵測系統的商用軟體,不過大多必須依賴廠商提供特徵碼或是相關的分析機制,以進行主機端的行為分析。而本文所介紹的OSSEC則屬於開放原始碼(Open Source)的主機型入侵偵測系統,是由Daniel B. Cid領導的團隊所開發出來的,目前最新的版本為1.5.1。
OSSEC HIDS整合了log分析、檔案一致性檢查、Window Registry監控、rootkit偵測及時警告與主動回應等多項目功能。另外,OSSECHIDS也支援Linux、OpenBSD、FreeBSD、MacOS、Solaris和Windows等多種作業系統,部署上相當方便。
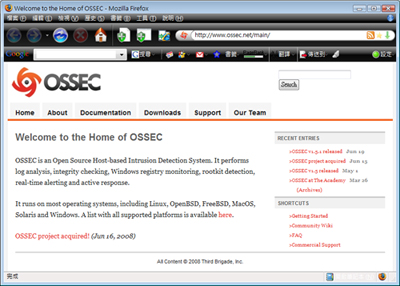 |
| ▲OSSEC的官方網站(www.ossec.net) |
OSSEC因為具備強大的功能,而被LinuxWord評選為五大開放原始碼的安全工具之一(http://www.linuxworld.com/news/2007/031207-top-5-security.html),目前使用OSSEC的使用者相當多,基本上OSSEC HIDS為主機型的入侵偵測系統,因此為了建置偵測的架構,在所有想要納入監控的主機上都必須安裝,其安裝方式可分成Loacal和Server/Agent兩種類型。若是單一主機,可選擇Local方式安裝;若是有多台主機,則建議採用Server/Agent,在多台主機中選擇一台以Server方式安裝做為Server,而在其他主機上則以Agent方式安裝OSSEC HIDS。Agent便會將偵測到的事件送到Server端,管理者便可由Server統一監看所有伺服器的安全狀態了。
另外,OSSEC HIDS也可接收Syslog,所以無法安裝OSSEC HIDS的設備,例如網路設備等也可將Syslog送到Server端進行log分析,不過大多只限於分析log,其他功能如檔案一致性檢查等就沒辦法處理了。OSSEC HIDS的架構如下所示:
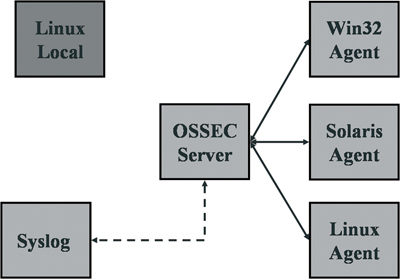 |
| ▲OSSEC HIDS架構 |
在瞭解OSSEC HIDS的架構後,接著就可以著手安裝了。本文採用Server/Agent的架構來介紹,整個安裝程序分成以下幾個部分,分別是:
安裝OSSEC HIDS Serer
安裝OSSEC HIDS時必須先取得相關的套件,另外為了確保所取得套件的正確性,可一併下載md5的編碼,下載套件檔案後,再透過MD5編碼比對編碼後的字串與官方網站上的編碼字串,必須完全吻合才能夠通過驗證。
STEP 1 下載最新版之OSSEC HIDS套件和checksum資料。
# wget http://www.ossec.net/files/ossec-hids-1.5.1.tar.gz
# wget http://www.ossec.net/files/ossec-hids-1.5.1_
checksum.txt
# md5sum ossec-hids-1.5.1.tar.gz
1269e0274cb0debce0d4d30b32fba083 ossec-hids- 1.5.1.tar.gz
# cat ossec-hids-1.5.1_checksum.txt
MD5 (ossec-hids-1.5.1.tar.gz) = 1269e0274cb0debce0d
4d30b32fba083
SHA1 (ossec-hids-1.5.1.tar.gz) = 4cc2d8d01a59d81f7e8
a8c66fb800152d7f2c15c
MD5 (ossec-agent-win32-1.5.1.exe) = d55aefb358dbeea
570a4d82ae3b72c59
SHA1 (ossec-agent-win32-1.5.1.exe) = af053241d9c51d
dd0365ce7d441f7d8a04b1148d |
下載套件時,建議同時下載checksum,利用md5sum指令可驗證下載的套件是否是完整、未被竄改過的正確版本。
STEP 2 解開套件進行安裝,利用tar指令解壓縮,再執行安裝的程序檔案。
# tar –zxvf ossec-hids-1.5.1.tar.gz
# cd ossec-hids-1.5.1
# ./install.sh |
執行安裝script後會進入文字設定畫面,首先是語言選項,預設使用英文(en),而目前只支援簡體中文,所以建議選用預設的英文語言,按下Enter繼續安裝動作。
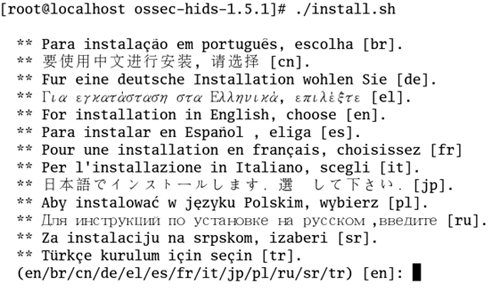 |
| ▲install.sh執行畫面—選擇語系 |
在正式安裝前,安裝程式會提示目前的套件版本、安裝需求以及目前的系統環境,然後再繼續後續的安裝。
OSSEC HIDS v1.5.1 Installation Script - http://www. ossec.net
You are about to start the installation process of the
OSSEC HIDS.
You must have a C compiler pre-installed in your system.
If you have any questions or comments, please send an
e-mail
to dcid@ossec.net (or daniel.cid@gmail.com).
- System: Linux phe22.sro.nchc.org.tw 2.6.18-92.1.6. el5
- User: root
- Host: phe22.sro.nchc.org.tw
-- Press ENTER to continue or Ctrl-C to abort. -- |
整個安裝的設定分成三大步驟,首先選擇安裝類型,目前先進行伺服端的安裝,所以安裝時必須輸入「server」。
| 1- What kind of installation do you want (server, agent, local or help)? server
- Server installation chosen. |
第二個部分則是選擇安裝環境,預設的安裝目錄為「/var/ossec」,通常直接使用預設值即可,如果有特殊的需求,也可以自行指定安裝到其他的路徑中。
2- Setting up the installation environment.
- Choose where to install the OSSEC HIDS [/var/ossec]:
- Installation will be made at /var/ossec . |
第三個部分為OSSEC HIDS組態的設定,包含以下幾項:
當警告出現時是否要發出E-mail通知,若為yes,則須再提供郵件帳號、SMTP主機等資訊。
預設值yes。
預設值為yes。
若偵測到可能的攻擊行為,主動設定tcp wrapper或使用防火牆阻擋攻擊,預設值為yes。
啟動log伺服器功能時,會開啟UDP 514 port來接收其他主機送來的Syslog,無法安裝OSSEC HIDS的設備可透過這個方式將log送給伺服器端,預設值為yes。
完成上述的設定後,就按下鍵進行後續的程式編譯和安裝。
3- Configuring the OSSEC HIDS.
3.1- Do you want e-mail notification? (y/n) [y]:
- What's your e-mail address? root@localhost
- We found your SMTP server as: 127.0.0.1
- Do you want to use it? (y/n) [y]:
--- Using SMTP server: 127.0.0.1
3.2- Do you want to run the integrity check daemon? (y/n) [y]: y
- Running syscheck (integrity check daemon).
3.3- Do you want to run the rootkit detection engine?(y/n) [y]: y
- Running rootcheck (rootkit detection).
3.4- Active response allows you to execute a specific command based on the events received. For
example,
you can block an IP address or disable access for
a specific user. More information at:
http://www.ossec.net/en/manual.html#active- response
- Do you want to enable active response? (y/n) [y]: y
- Active response enabled.
- By default, we can enable the host-deny and the firewall-drop responses.
The first one will add a host to the /etc/hosts.deny and the second one will block the host on iptables (if linux)
or on ipfilter (if Solaris, FreeBSD or NetBSD).
- They can be used to stop SSHD brute force scans, portscans and some other forms of attacks. You can
also add them to block on snort events, for example.
- Do you want to enable the firewall-drop response? (y/n) [y]: y
- firewall-drop enabled (local) for levels >= 6
- Default white list for the active response:
- 140.110.96.1
- 168.95.1.1
- Do you want to add more IPs to the white list? (y/n)? [n]:
3.5- Do you want to enable remote syslog (port 514 udp)? (y/n) [y]:
- Remote syslog enabled.
3.6- Setting the configuration to analyze the following logs:
-- /var/log/messages
-- /var/log/secure
-- /var/log/maillog
-- /var/log/httpd/error_log (apache log)
-- /var/log/httpd/access_log (apache log)
-- /etc/httpd/logs/access_log (apache log)
-- /etc/httpd/logs/error_log (apache log)
- If you want to monitor any other file, just change the ossec.conf and add a new localfile entry.
Any questions about the configuration can be answered by visiting us online at http://www.ossec.net .
--- Press ENTER to continue --- |
在完成OSSEC HIDS程式編譯安裝後,會出現以下訊息,此時請按下Enter鍵完成整個安裝程序。
Thanks for using the OSSEC HIDS.
If you have any question, suggestion or if you find any
bug,
contact us at contact@ossec.net or using our public
maillist at
ossec-list@ossec.net
( http://www.ossec.net/main/support/ ).
More information can be found at http://www.ossec.net
--- Press ENTER to finish (maybe more information below). --- |
在完成安裝動作後,就可以來啟動OSSEC主機入侵偵測軟體。啟動的指令為「/var/ossec/bin/ossec-control start」,如果未來想要停止OSSEC,將「start」更換成「stop」即可。啟動後,畫面上將會看到OSSEC啟動的訊息,包括軟體的版本以及載入的相關程式。
# /var/ossec/bin/ossec-control start
Starting OSSEC HIDS v1.5.1 (by Third Brigade, Inc.)...
Started ossec-maild... Started ossec-execd...
Started ossec-analysisd... Started ossec-logcollector...
Started ossec-remoted... Started ossec-syscheckd...
Started ossec-monitord...
Completed. |
利用查詢執行程序的工具「ps」,確認一下目前系統上是否已執行ossec,可使用「ps-ef | grep ossec」指令與參數進行查詢。
# ps -ef | grep ossec ossecm 31806 1 0 14:28 ? 00:00:00 /var/ossec/
bin/ossec-maild root 31810 1 0 14:28 ? 00:00:00 /var/ossec/
bin/ossec-execd ossec 31814 1 0 14:28 ? 00:00:00 /var/ossec/
bin/ossec-analysisd root 31818 1 0 14:28 ? 00:00:00 /var/ossec/
bin/ossec-logcollector root 31828 1 0 14:28 ? 00:00:00 /var/ossec/
bin/ossec-syscheckd ossec 31832 1 0 14:28 ? 00:00:00 /var/ossec/
bin/ossec-monitord root 31838 30681 0 14:28 pts/1 00:00:00 grep ossec |
安裝 Server端Web介面
安裝好伺服端之後,為了便於操作與管理,建議安裝網頁介面的管理套件「ossec-wui」,以下介紹安裝過程。
STEP 1 下載ossec-wui套件和checksum,並進行md5 checksum驗證
# wget http://www.ossec.net/files/ui/ossec-wui-0.3.tar.gz
# wget http://www.ossec.net/files/ui/ossec-wui-0.3-checksum.txt
# md5sum ossec-wui-0.3.tar.gz
c79fa486e9a20fb06a517541033af304 ossec-wui- 0.3.tar.gz
# cat ossec-wui-0.3-checksum.txt
MD5 (ossec-wui-0.3.tar.gz) = c79fa486e9a20fb06a5175 41033af304
SHA1 (ossec-wui-0.3.tar.gz) = e00bff680721982ee5529
5a5292eb4e2a638b820 |
STEP 2 將套件解壓縮,然後放到網頁目錄下。可以依據系統上的環境來決定網頁目錄的位置與資料夾。
# tar -zxvf ossec-wui-0.3.tar.gz
# mv ossec-wui-0.3 /var/www/html/ossec-wui |
STEP 3 執行安裝程序,可透過套件所提供的「setup.sh」程序檔來完成,執行時須留意該程式的權限屬性,安裝過程須設定系統管理員的帳號與密碼,可依照個人的偏好自行設定。
# cd /var/www/html/ossec-wui/
# ./setup.sh
Setting up ossec ui...
Username: admin
New password:
Re-type new password:
Adding password for user admin
Setup completed successfuly. |
執行「./setup.sh」後,在「ossec-wui」目錄下會建立「.htpasswd」及「.htaccess」兩個檔案,「.htpasswd」檔存放的是建立的帳號密碼,但apache預設並不會讀取這個設定檔案,因此必須做修改,自行建立一個此目錄的設定檔「/etc/httpd/conf.d/ossec.conf」,再利用文書編輯軟體輸入以下的內容:
Options None
AllowOverride None
Order allow,deny
Allow from all
AuthName "OSSEC Access"
AuthType Basic
AuthUserFile /var/www/html/ossec-wui/.htpasswd Require valid-user
|
STEP 4 將Web執行的使用者(apache)的角色加入ossec群組。
# usermod -G ossec apache
# cat /etc/group | grep ossec
ossec:x:501:apache
|
STEP 5 修改php設定選項,以支援長期間執行的script及較多的記憶使用,而php設定檔為「/etc/php.ini」。
max_execution_time = 180
max_input_time = 180
memory_limit = 30M
|
STEP 6 使用以下的指令與參數來重新啟動httpd服務。
STEP 7 接著登入ossec-wui介面。以瀏覽器開啟ossec-wui網頁「URL://server-IP/ossec-wui/」,筆者建好的ossec-wui頁面如下所示:
 |
| ▲ossec-wui畫面 |
安裝OSSEC HIDS Agent
安裝Agent與安裝Server的方式差不多,都是下載相同的套件,做md5 checksum驗證,解開套件後執行安裝程序「install.sh」。不同的地方只在於,安裝類型必須選擇agent。而在組態設定部分,須指定Server端的IP,其安裝程序執行畫面如下:
1- What kind of installation do you want (server, agent, local or help)? agent
- Agent(client) installation chosen.
2- Setting up the installation environment.
- Choose where to install the OSSEC HIDS [/var/ossec]:
- Installation will be made at /var/ossec.
3- Configuring the OSSEC HIDS.
3.1- What's the IP Address of the OSSEC HIDS server?: server-IP
- Adding Server IP server-IP
3.2- Do you want to run the integrity check daemon? (y/n) [y]: y
- Running syscheck (integrity check daemon).
3.3- Do you want to run the rootkit detection engine? (y/n) [y]: y
- Running rootcheck (rootkit detection).
3.4 - Do you want to enable active response? (y/n) [y]: y
3.5- Setting the configuration to analyze the following logs:
-- /var/log/messages
-- /var/log/secure
-- /var/log/maillog
-- /var/log/httpd/error_log (apache log)
-- /var/log/httpd/access_log (apache log)
-- /etc/httpd/logs/access_log (apache log)
-- /etc/httpd/logs/error_log (apache log)
- If you want to monitor any other file, just change the ossec.conf and add a new localfile entry.
Any questions about the configuration can be answered by visiting us online at http://www.ossec.net .
--- Press ENTER to continue --- |
Agent的管理
在上一段的說明中,已經安裝了Serer端與Agent端,但是在Server端還看不到Agent端的資料,這是因為在OSSEC HIDS的Server/Agent架構中,兩端的通訊是加密且須經過認證。因此,對一個Agent而言,均須由Server產生一組認證金鑰(Authentication Key)。金鑰產生後,由Server端匯出,再匯入到Agent中。這樣Agent才能把訊息送到Server端。整個設定包括以下幾個步驟:
在Server端新增Agent
在Server端可透過manage_agents指令來進行,假定Agent的主機名稱為「phe23」,IP為「192.168.0.23」,則manage_agents指令的設定範例如下,其中Agent的ID可自動產生或自行指定,新增完成後可輸入「Q」來結束程式:
# /var/ossec/bin/manage_agents
****************************************
* OSSEC HIDS v1.5.1 Agent manager. *
* The following options are available: *
****************************************
(A)dd an agent (A).
(E)xtract key for an agent (E).
(L)ist already added agents (L).
(R)emove an agent (R).
(Q)uit. Choose your action: A,E,L,R or Q: A
- Adding a new agent (use '\q' to return to the main menu).
Please provide the following:
* A name for the new agent: phe23
* The IP Address of the new agent: 192.168.0.23
* An ID for the new agent[001]:
Agent information:
ID:001
Name:phe23
IP Address: 192.168.0.23
Confirm adding it?(y/n): y
Agent added. |
由Server端匯出金鑰
要匯出金鑰,同樣是使用manage_agents指令。進入程序後,輸入「E」來匯出金鑰。在匯出金鑰時須知道Agent的ID,在上面的例子中,phe22這台主機的ID為001,其執行過程如下:
****************************************
* OSSEC HIDS v1.5.1 Agent manager. *
* The following options are available: *
****************************************
(A)dd an agent (A).
(E)xtract key for an agent (E).
(L)ist already added agents (L).
(R)emove an agent (R).
(Q)uit.
Choose your action: A,E,L,R or Q: E
Available agents:
ID: 001, Name: phe23, IP: 192.168.0.23
Provide the ID of the agent to extract the key (or '\q' to quit): 001
Agent key information for '001' is:
MDAxIHBoZTIzIDE0MC4xMTAuMTA0LjIzIDdmMWFiNTI
xM2NkNDFhNTZhODBkMTZmOWI5NjI4MjU5ZTliNDc2Y jllNWE1ZjgzZmYyZGRlMzFmYTVkOWVjMmE=
** Press ENTER to return to the main menu. |
在Agent端匯入金鑰
由Server端建立Agent,然後匯出金鑰,接著在Agent端執行manage_agents指令將匯出的金鑰匯入Agent端:
# /var/ossec/bin/manage_agents
****************************************
* OSSEC HIDS v1.5.1 Agent manager. *
* The following options are available: *
****************************************
(I)mport key from the server (I).
(Q)uit.
Choose your action: I or Q: i
* Provide the Key generated by the server.
* The best approach is to cut and paste it.
*** OBS: Do not include spaces or new lines.
Paste it here (or '\q' to quit): MDAxIHBoZTIzIDE0MC
4xMTAuMTA0LjIzIDdmMWFiNTIxM2NkNDFhNTZhODBk MTZmOWI5NjI4MjU5ZTliNDc2YjllNWE1ZjgzZmYyZGRl
MzFmYTVkOWVjMmE=
Agent information:
ID:001
Name:phe23
IP Address:192.168.0.23
Confirm adding it?(y/n): y Added.
** Press ENTER to return to the main menu. |
在Server與Agent端重新啟動OSSEC-HIDS 完成Server與Agent端的金鑰設定後,使用restart參數重新啟動OSSEC HIDS,讓剛剛的設定生效,執行指令如下:
| # /var/ossec/bin/ossec-control restart |
完成以上的設定後,就建立好Server與Agent之間的連線了,如此一來就可以在Server上查詢有關Agent端的訊息。
設定完成後,可以到ossec-wui的網頁介面上檢查一下是否看得到Agent的資料,若設定正確,新的agents就會顯示在「Available agents」的部分,範列畫面如下。
 |
| ▲新增Agent畫面 |
管理介面的介紹
在完成基本設定後,接下來將針對ossec-wui做個簡單的介紹,讓各位熟悉整個操作的使用者介面與作業的方式,其網頁內容分成「Main」、「Search」、「Integrity checking」、「Stats」與「About」等五個選單畫面,以下分別說明:
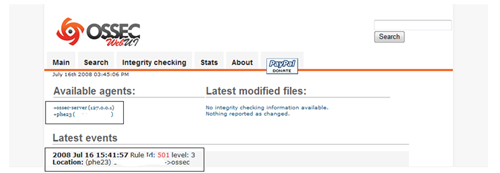
Main選單
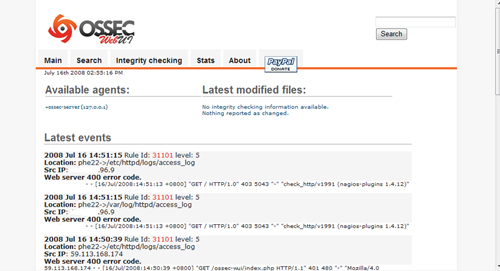
ossec-wui的網頁介面預設會進入Main選單中,在頁面左上方會顯示目前可見的Agents,可進一步點擊各個Agent來查詢進階的資訊,而頁面的右上方則會顯示最近被修改過的檔案,由於系統才剛建置完成,所以圖中表示目前沒有被修改過的檔案。而頁面下方,則會顯示最近發生的事件。
Search選單
當系統維運一段時間之後,產生的事件將會變多,要查詢特別的事件就比較麻煩。此時,就可透過Search選單來縮小查詢的範圍,使用者可依發生時間區間、事件等級和類型等條件來進行進階的事件查詢。
Integrity checking選單
對於檔案修改的紀錄可透過「Integrity checking」選單進行查詢,畫面上方的「Agent name」下拉式選單可以選擇欲查詢的Agent。「Latest modified files」欄位則會列出修改過的檔案名稱,若點擊檔案名稱的連結,畫面將會跳到下方的檔案一致性資料庫,使用者將可查詢到檔案大小的變化與最後修改的時間。
Stats選單
此選單呈現目前所收集事件的統計資料,包括各種安全等級、各種規則及每小時的事件分布統計。
About選單
最後的About選單則提供「ossec wui」套件的相關資訊,選單中提供了套件的說明,包括開發團隊與使用授權的資訊。